
The Ultimate Grilled Cheese Recipe for Comfort Food Lovers
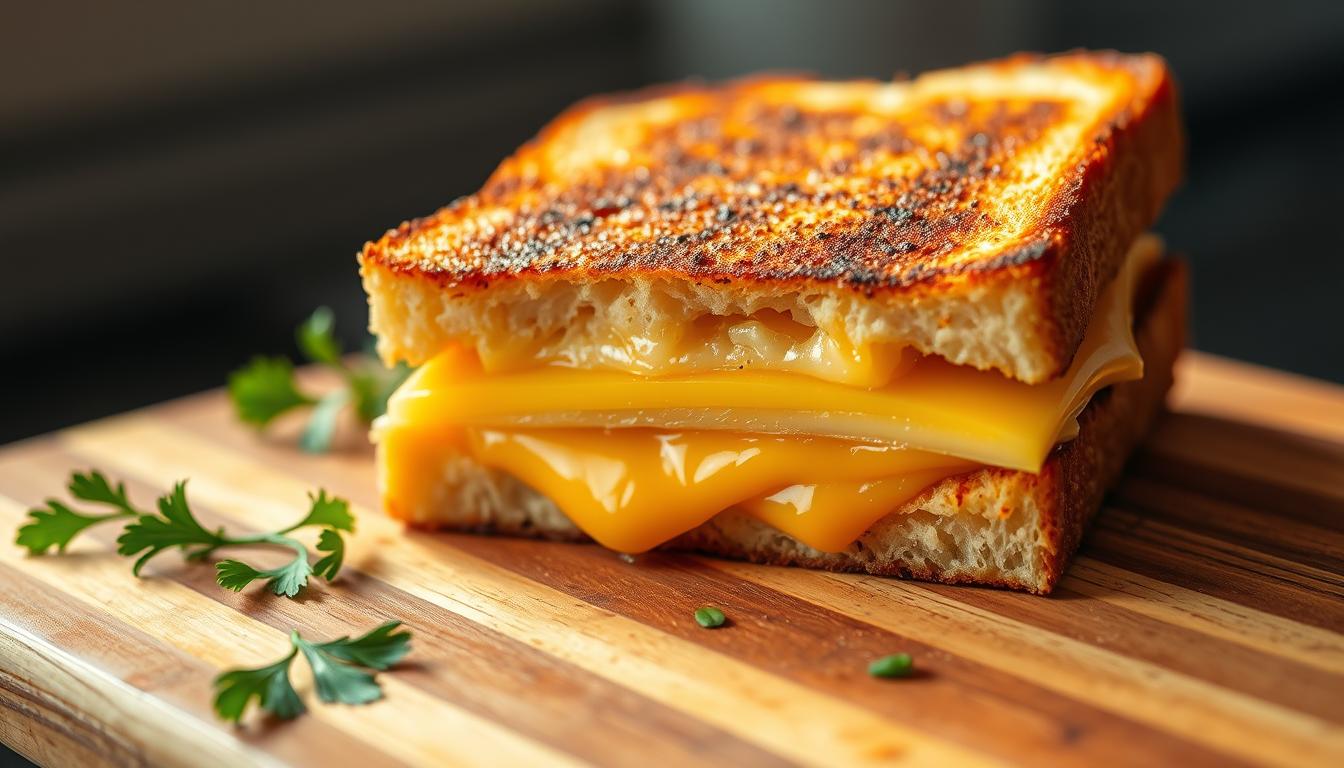
Table of Contents
There’s something magical about sinking your teeth into a warm, golden-brown sandwich that crackles with every bite. Maybe it reminds you of rainy afternoons as a kid or late-night cravings when only pure comfort would do. That’s the power of a perfectly crafted creation—simple, nostalgic, and utterly satisfying.
This guide isn’t just about slapping ingredients between slices of bread. We’ll show you how to balance a crisp exterior with a luxuriously melty core—no soggy middles or uneven browning. You’ll discover why your choice of dairy matters (hint: not all cheeses behave the same) and how to avoid common kitchen pitfalls.
Whether you’re a traditionalist or love bold twists, we’ve got you covered. Learn why butter alternatives can make or break your toastiness and how to layer flavors for maximum impact. By the end, you’ll craft a sandwich that feels like a culinary hug—every single time.
Ready to transform basic ingredients into something extraordinary? Let’s turn that humble loaf and block of cheese into your new favorite meal.
Introduction to Your Ultimate Grilled Cheese Recipe Experience
Imagine wrapping your hands around a plate-sized masterpiece where crunch meets creaminess in perfect harmony. This isn’t just about filling your stomach—it’s about reigniting memories while creating new ones through thoughtful preparation.
Why Comfort Food Hits Different
That first bite transports you. Crisp edges give way to molten layers, while subtle tang from ingredients like mayonnaise elevates every mouthful. It’s culinary alchemy—transforming humble components into soul-warming satisfaction.
Secrets Behind the Magic
What makes this version exceptional? A balanced approach. While traditional methods work, our tweaks ensure even browning without sacrificing texture. The mayo trick isn’t just hype—it creates that golden crust while letting the star ingredients shine.
Pairing suggestions matter too. A bright tomato element cuts through richness, creating flavor contrast that keeps each bite exciting. You’ll discover how small adjustments transform familiar sandwiches into extraordinary experiences.
Ready to unlock these techniques? We’ll guide you through selecting components that melt perfectly and methods that guarantee consistent results. Your kitchen is about to become a comfort food laboratory.
Why Grilled Cheese is a Comfort Food Classic
The journey of this beloved dish began as a Depression-era staple, evolving into a canvas for culinary creativity. Its enduring appeal lies in how it adapts to trends while staying rooted in simplicity—a quality that cemented its place in American culture.
The History and Evolution of the Sandwich
In the 1920s, open-faced versions with mild dairy products gained popularity as affordable meals. The 1950s introduced pre-sliced bread and processed varieties, making it a lunchbox favorite. Today, artisanal interpretations feature aged cheddar or gouda paired with sourdough or rye.
| Era | Cheese Used | Bread Type | Key Technique |
|---|---|---|---|
| 1920s | American Singles | White Sandwich | Pan-Fried |
| 1950s | Processed Slices | Pre-Sliced Loaf | Buttered Griddle |
| Today | Aged Cheddar, Gouda | Sourdough, Rye | Multi-Layer Melting |
What started as a single slice between toasted pieces now thrives on experimentation. The right number of dairy layers ensures even melt without overwhelming the bread. Sharp cheddar adds depth, while creamy options create silkiness.
Understanding this evolution transforms how you approach each bite. It’s not just about nostalgia—it’s about honoring a legacy of ingenuity, one golden-brown creation at a time.
Essential Ingredients for the Ultimate Grilled Cheese Recipe
Ingredient choice separates forgettable meals from unforgettable experiences. Your creation’s success hinges on three pillars: foundation, melt factor, and crunch. Let’s break down how each component contributes to that iconic combination of textures and flavors.
Choosing the Right Bread and Cheeses
Start with sturdy sourdough or classic white bread—both hold up to heat without becoming dense. Thick slices (½ inch) prevent sogginess while allowing even browning. For dairy selections, balance meltability with personality. Sharp cheddar cheese adds tang, while Gruyère offers nuttiness. Raclette creates silky pools between layers.
Combine two varieties for depth—one creamy, one bold. Three to four thin slices per sandwich ensure full coverage without overwhelming the bread. Avoid pre-shredded options; they often contain anti-caking agents that hinder smooth melting.
Importance of Butter and Mayo for a Perfect Exterior
That golden crunch comes from fat management. Spread butter room-temperature on the outer sides of your bread—it caramelizes slowly for deeper flavor. A thin mayo layer (mixed with butter if desired) boosts browning and prevents burning.
Use one tablespoon of fat total per sandwich. Press gently with a spatula during cooking to ensure full contact with the pan. This technique creates an even exterior that stays crisp long after the first bite.
Experimentation is key. Try smoked gouda with rye or brie on brioche. Quality ingredients transform simple combinations into something extraordinary—every time.
Step-by-Step Guide to Making Your Grilled Cheese Sandwich

Creating the ideal version starts with precision—every detail matters. Follow these techniques to achieve that signature crunch and creamy interior every time.
Prepping Your Ingredients
Spread a thin layer of mayonnaise on the outer sides of your bread slices. This creates a golden crust without overpowering flavors. Layer 3-4 thin dairy slices between the bread, mixing varieties like sharp cheddar and mild gouda for balance.
Choose bread cut to ½-inch thickness. Thinner slices burn easily, while thicker ones trap steam, leading to sogginess. Keep your cast iron pan nearby—its even heat distribution is key.
Mastering the Cooking Techniques
Preheat your pan over low heat for 2 minutes. Place the sandwich in the center, pressing gently with a spatula. Cook for 3-4 minutes until the underside turns amber-brown.
Flip carefully using a wide spatula. Reduce the heat slightly if the pan feels too hot. The second side usually cooks faster—check after 2 minutes. Perfect timing ensures melted layers without burnt edges.
| Technique | Temp | Time | Outcome |
|---|---|---|---|
| Cast Iron Sear | Low | 3-4 mins/side | Even Browning |
| Stainless Steel | Medium-Low | 2-3 mins/side | Crisp Exterior |
| Non-Stick Skillet | Low | 4-5 mins/side | Gentle Melt |
Let the sandwich rest 1 minute before cutting. This allows the dairy to set slightly, preventing spillage. Serve immediately while the crust remains crackly and the center stays velvety.
Tips and Tricks for a Crispy, Golden Exterior
Achieving that perfect crunch requires more than just good ingredients—it demands technique. The difference between a soggy letdown and a textural masterpiece lies in how you manage heat, fat, and patience.
Mayonnaise vs. Butter: The Ultimate Debate
Spreadable fats define your crust’s personality. Butter offers rich flavor but burns easily. Mayo’s higher smoke point creates a uniform golden brown finish without scorching. For best results, mix both: butter for taste, mayo for crispness.
Apply a thin layer to bread’s outer sides—about ½ teaspoon per slice. This ensures full coverage while preventing greasiness. Remember: too little fat leads to uneven browning; too much drowns the bread.
Low Heat, Patient Cooking, and Lid Techniques
Start with a cold skillet—cast iron works best—then gradually warm it to medium-low. Slow cooking melts layers evenly while crisping the exterior. Cover with a lid for 60 seconds mid-cook to trap steam, softening the bread slightly for better melt.
Flip when the underside turns amber. Press gently with a spatula to ensure contact. A properly heated skillet distributes heat evenly, giving you that signature crunch every time. Wait 2 minutes before slicing—the reward is worth it.
Expert Variations to Customize Your Grilled Cheese Recipe

Elevate your sandwich game by exploring unexpected ingredients that add depth and excitement. Think beyond the basics—culinary innovators have proven this dish thrives on personal flair. The key lies in balancing textures while keeping that irresistible melt front and center.
Flavor Layers That Transform Ordinary to Extraordinary
Try sautéed mushrooms with thyme or caramelized onions for earthy sweetness. Thin apple slices or pear wedges bring refreshing crunch. For heat, a sprinkle of pepper or melted pepper jack creates a spicy kick without overwhelming the palate.
Stack multiple dairy varieties for complexity. Pair creamy brie with sharp aged cheddar, or mix smoked gouda with mozzarella. Three layers work best—enough to create gooey pockets without drowning the bread.
Chef-Approved Upgrades Worth Trying
Top chefs recommend brushing bread with garlic-infused olive oil or adding a swipe of fig jam. One Michelin-starred cook swears by kimchi for tangy contrast. Another suggests bacon jam for smoky richness that complements the cheese melted to silky perfection.
Want to make grilled creations shine? Add fresh basil or rosemary between layers. Or press pickled jalapeños into the dairy before cooking. These tweaks keep the soul of the dish intact while introducing new dimensions.
Your kitchen, your rules. Mix roasted red peppers with fontina. Spread mango chutney under melted havarti. Every experiment brings you closer to discovering your best grilled masterpiece—one delicious bite at a time.
How to Serve and Pair Your Grilled Cheese
The right pairing turns a simple meal into a moment to savor. Think beyond the plate—texture contrasts and flavor harmonies create a dining experience that feels intentionally crafted. Start by slicing diagonally: those triangular halves aren’t just nostalgic—they expose more surface area for dipping.
Perfect Pairings: Tomato Soup and Beyond
Classic tomato soup isn’t just tradition—its bright acidity cuts through rich flavors, while its warmth mirrors the sandwich’s crispy exterior. For a modern twist, swirl in basil pesto or add a dollop of crème fraîche on top.
Prefer something crunchy? Try dill pickles or a tangy slaw. Both add freshness that balances the melted layers. A light arugula salad with lemon vinaigrette works too—its peppery bite cleanses the palate between bites.
Presentation matters. Serve your creation on a wooden board with ramekins of soup for dipping. Stack sweet potato fries or kale chips on the side for added crunch. For gatherings, cut sandwiches into finger-sized strips and arrange them around a communal bowl of roasted red pepper bisque.
Want to top it all off? Sprinkle everything bagel seasoning on the crust before cooking, or add a drizzle of hot honey post-grill. These tiny touches transform comfort food into a meal that delights all senses.
Troubleshooting Common Grilled Cheese Challenges
Even the simplest dishes can hit snags—here’s how to fix them. A soggy bottom or stubbornly solid dairy layers can derail your meal. But with the right adjustments, you’ll turn kitchen frustrations into flawless results every time.
Fixing Texture and Melt Mishaps
Soggy bread often stems from high heat or uneven fat distribution. If your slices feel damp, reduce the burner temperature. Low-and-slow cooking lets the exterior crisp while giving layers time to soften properly. Spread mayo or butter evenly across the entire surface—skip the edges, and you’ll get limp spots.
For brown cheese that refuses to melt, check your dairy choices. Aged varieties like cheddar need help. Add a slice of Monterey Jack or mozzarella between layers—their high moisture content kickstarts the melting process. Press the sandwich gently with a spatula to encourage contact.
| Issue | Cause | Fix |
|---|---|---|
| Greasy Exterior | Too much fat | Use ½ tsp per bread side |
| Burnt Edges | High heat | Cook on medium-low |
| Uneven Browning | Uneven pan contact | Press with weighted lid |
Boost flavor while solving texture issues. Brush bread with garlic-infused butter before cooking—it adds aroma without extra moisture. Pair your creation with acidic sides like pickles or apple slices to balance richness. This way, every bite stays exciting.
Remember: Great sandwich recipes rely on patience. Let the pan preheat fully, and don’t rush the flip. With these tweaks, you’ll master the art of golden crusts and velvety centers—no guesswork required.
Conclusion
Transforming simple ingredients into a textural masterpiece lies in your hands now. You’ve learned how quality bread and balanced cheeses create harmony between crunch and creaminess. Remember: low heat and patience yield that iconic golden exterior without sacrificing the molten core.
Whether using classic cheddar or adventurous pepper jack, your choices shape each bite. Master the mayo-butter blend for crispness, and don’t rush the flip—let the pan work its magic. Troubleshooting tips ensure no more soggy slices or stubborn unmelted layers.
Make it yours. Add caramelized onions or a swipe of garlic butter. Pair with tangy tomato soup or crunchy pickles for contrast. Every tweak reflects your taste while honoring the dish’s comforting soul.
Now’s the time. Grab your skillet, layer those slices, and craft something extraordinary. Share it proudly—you’ve earned every satisfying crunch.
Author’s Topic